

An administrator needs to back up their VMware virtual machines from on-premises AFF to AWS S3 using SnapCenter.
Which two requirements must be met to enable use of the SnapCenter Plug-in? (Choose two.)
- A . The Plug-in must be installed on each VM.
- B . The Plug-in must be registered with BlueXP.
- C . The Plug-in must be installed in vCenter.
- D . The Plug-in must register the S3 bucket.
B, C
Explanation:
To utilize the SnapCenter Plug-in for VMware vSphere to back up VMware virtual machines from on-premises AFF (All Flash FAS) systems to AWS S3, it’s crucial to meet specific requirements:
Plug-in Installation in vCenter: The SnapCenter Plug-in for VMware vSphere must be installed directly within the VMware vCenter Server. This integration allows the plug-in to manage and coordinate the backup operations directly from the vCenter, providing centralized management and control over the backup processes.
Registration with BlueXP (formerly NetApp Cloud Manager): The plug-in must be registered with BlueXP. BlueXP serves as a unified control plane for orchestrating and managing NetApp’s hybrid cloud storage and data services. Registering the plug-in with BlueXP ensures it can communicate and operate seamlessly with other NetApp services, including storage orchestration to AWS S3.
These steps are designed to ensure the SnapCenter Plug-in operates effectively within the VMware environment and interacts correctly with NetApp’s cloud data services, facilitating the backup process to AWS S3.
For more detailed guidance, reference the SnapCenter documentation available through the NetApp support site: NetApp SnapCenter Documentation.
An administrator is preparing to automate firmware updates with the help of Active IQ Digital Advisor.
Which automation tool should the administrator use?
- A . Puppet
- B . Terraform
- C . Ansible
- D . Pulumi
C
Explanation:
To automate firmware updates effectively using Active IQ Digital Advisor, the best tool to use is Ansible.
Here’s why:
Ansible Integration with NetApp: Ansible is widely recognized for its powerful automation capabilities across various IT environments. NetApp provides specific Ansible modules designed to interact with its storage solutions and services, including the automation of firmware updates. Active IQ Digital Advisor Integration: Active IQ Digital Advisor offers predictive analytics, actionable intelligence, and proactive recommendations. By using Ansible, administrators can automate the implementation of these recommendations, including firmware updates, to enhance efficiency and reliability in operations.
To implement this, the administrator needs to leverage the NetApp Ansible modules that are specifically designed for storage management tasks. This can be found in the NetApp Automation Store, where administrators can access pre-built playbooks for firmware updates, simplifying the automation process.
For further details and specific implementation steps, please refer to the NetApp Automation Store and the official NetApp documentation on Ansible integration: NetApp Ansible Modules Documentation.
An administrator wants to migrate their SMB file server from on-premises to CVO using Cloud Sync. The NTFS ACLs need to be transferred.
What should the administrator do?
- A . Select the "Copy Access Control Lists to the target" option in the DataBroker settings
- B . Use the rsync command after the sync is complete
- C . Select the "Copy Access Control Lists to the target" option in Cloud Sync
- D . Create an SVM-DR relationship with "Identity preserve set to true"
C
Explanation:
To ensure a seamless migration of SMB file servers from on-premises environments to Cloud Volumes ONTAP (CVO) while preserving NTFS Access Control Lists (ACLs), the following steps should be followed using Cloud Sync:
Setting Up Cloud Sync: Initiate a new data sync relationship using the Cloud Sync service. This service is designed to simplify data migration across diverse environments, including on-premises to cloud migrations.
Preserving NTFS ACLs: During the setup process in Cloud Sync, select the option "Copy Access Control Lists to the target". This ensures that all NTFS ACLs associated with the files and directories are
accurately replicated on the CVO system. This option is crucial for maintaining the security and access configurations that were in place on-premises.
Execute and Monitor the Migration: After configuring the settings, start the data migration process. Monitor the process via the Cloud Sync interface to ensure all data, including ACLs, is transferred without issues.
For more detailed instructions and best practices, refer to the NetApp Cloud Sync User Guide, which provides comprehensive steps and guidance on using Cloud Sync effectively: NetApp Cloud Sync User Guide.
An administrator wants to automate the configuration of SnapMirror policies between cloud and on-premises deployments in AWS using Ansible.
What must the administrator do first?
- A . Set up AWS Control Tower for automation
- B . Subscribe to Ansible Automation Platform
- C . Install the ONTAP collection using Ansible Galaxy
- D . Install the Ansible plugin for aws_ec2 inventory
C
Explanation:
To automate the configuration of SnapMirror policies between cloud and on-premises deployments in AWS using Ansible, the administrator needs to begin by installing the NetApp ONTAP collection from Ansible Galaxy. This collection contains modules specifically designed to manage NetApp ONTAP storage systems, including the management of SnapMirror configurations.
Here are the steps to do this:
Installation of ONTAP Collection: Open your command line interface and run the command ansible-galaxy collection install netapp.ontap. This command pulls the ONTAP collection from Ansible Galaxy, which includes all necessary modules for managing NetApp ONTAP, including SnapMirror. Configuration of Ansible Environment: Ensure that your Ansible environment is set up to connect to both your AWS environment and the on-premises NetApp ONTAP systems. This typically involves configuring the appropriate credentials and network settings in your Ansible playbooks and inventory files.
Writing Ansible Playbooks: With the ONTAP collection installed, you can now write Ansible playbooks that utilize the SnapMirror modules to automate the configuration of SnapMirror policies as required.
For further information on using the NetApp ONTAP Ansible collection, please refer to the official documentation available at: NetApp ONTAP Ansible Collection Documentation.
An administrator tries to deploy an SMB volume in Azure NetApp Files in the same region as their AD DS.
The deployment fails with the following error message:
![]()

What are two configuration options that must be verified? (Choose two.)
- A . The volume is in the same VNet.
- B . The Azure subscription has been activated.
- C . The Global Administrator role is configured.
- D . The Network Security Groups allows DNS traffic.
A, D
Explanation:
Based on the error message indicating an issue with querying the DNS server, two critical network-related configurations must be verified to successfully deploy an SMB volume in Azure NetApp Files: VNet Configuration: Ensure that the Azure NetApp Files volume and the Active Directory Domain Services (AD DS) are configured within the same Virtual Network (VNet). This is crucial as it ensures that the volume can communicate effectively with the AD DS, which is necessary for SMB authentication and service location.
Network Security Group (NSG) Settings: Verify that the Network Security Groups associated with the subnet or the VNet where the Azure NetApp Files volume is deployed allows DNS traffic. Specifically, inbound and outbound rules should permit traffic over the ports typically used by DNS (usually TCP/UDP 53). This allows the volume to successfully resolve DNS queries which are essential for integrating with AD DS.
These two checks are aimed at resolving connectivity and DNS resolution issues that are likely causing the deployment to fail. For more detailed troubleshooting and setup instructions, please refer to Azure’s official documentation on Network Security Groups and VNet configurations: Azure Networking Documentation.
An administrator configures the trident ontap-san driver and specifies useCHAP=true.
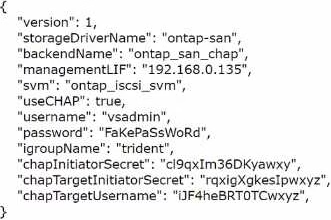

Which parameter is missing from the configuration?
- A . dataUF
- B . chapSecret
- C . clientPrivateKey
- D . chapUsername
D
Explanation:
When configuring the Trident ONTAP-SAN driver with CHAP (Challenge Handshake Authentication Protocol) enabled (useCHAP: true), it is essential to specify both the initiator and target CHAP secrets and their corresponding usernames. In the configuration provided, while the CHAP secrets for both initiator and target are specified (chapInitiatorSecret and chapTargetInitiatorSecret), only the CHAP target username (chapTargetUsername) is listed. The missing parameter necessary for the complete CHAP configuration is the CHAP initiator username (chapUsername). This username is used along with the chapInitiatorSecret to authenticate the initiator to the storage system.
To correct this, add the chapUsername field to the configuration file, ensuring that the initiator’s username matches the configured environment and that it is correctly paired with the chapInitiatorSecret. This inclusion ensures that both sides of the CHAP authentication process are properly identified, thereby providing the necessary security for SAN communication.
For further guidance on configuring CHAP with the Trident ONTAP-SAN driver, refer to the NetApp Trident documentation: NetApp Trident Documentation.
An administrator is configuring Cloud Backup Service (CBS) at a dark site to back up ONTAP volumes to StorageGRID.
Which NetApp networking component must be configured?
- A . Azure ExpressRoute
- B . VNet Gateway
- C . AWS Direct Connect
- D . BlueXP Connector
D
Explanation:
For configuring Cloud Backup Service (CBS) in a dark site to back up ONTAP volumes to StorageGRID, the necessary NetApp networking component to configure is the BlueXP Connector. The BlueXP Connector serves as a gateway to enable secure communication between on-premises environments and NetApp services, such as StorageGRID, especially in scenarios where direct internet connectivity is limited or non-existent (as in dark sites).
The BlueXP Connector acts as a local agent that facilitates the connection between your ONTAP
systems and NetApp’s cloud services without requiring direct internet access. This setup is crucial in
dark site scenarios where security and network isolation are paramount. By configuring the BlueXP
Connector, administrators can ensure that backup data is securely transmitted to StorageGRID,
adhering to organizational security policies.
To implement this, follow these steps:
Install and configure the BlueXP Connector in your environment.
Ensure it has appropriate network access to both the ONTAP systems and the internal network that connects to StorageGRID.
Configure CBS to use the BlueXP Connector for data transmissions to StorageGRID.
For more detailed instructions on setting up and configuring the BlueXP Connector for dark sites, visit the BlueXP documentation and setup guides available at NetApp’s official site: NetApp BlueXP Documentation.
Refer to the exhibit.
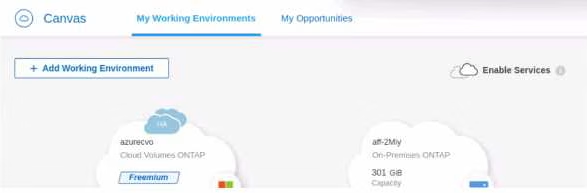

The administrator wants to replicate all the data from their On-Premises ONTAP to Cloud Volumes ONTAP.
What should the administrator do first?
- A . Drag and Drop Cloud Volumes ONTAP to On-Premises
- B . Drag and Drop On-Premises to Cloud Volumes ONTAP
- C . Add a third Working Environment with a Data Broker
- D . Update the Cloud Volumes ONTAP License from Freemium to Essentials
B
Explanation:
To replicate all data from an On-Premises ONTAP to Cloud Volumes ONTAP, the first step within the BlueXP (formerly NetApp Cloud Manager) interface is to establish a replication relationship.
Here’s how:
Setup Data Replication: In the BlueXP interface, drag and drop the On-Premises ONTAP environment onto the Cloud Volumes ONTAP environment. This action initiates the setup of a SnapMirror relationship, where the on-premises system acts as the source, and the cloud volumes serve as the destination.
Configure Replication Settings: After dragging and dropping, you will be prompted to configure the replication settings, including schedules, policies, and the volumes to be replicated.
Initiate and Monitor Replication: Once the configuration is completed, start the replication process. BlueXP provides tools to monitor the status and health of the replication, ensuring data is synchronized according to the defined settings.
This method leverages the integrated tools in BlueXP to simplify the management of hybrid cloud environments and ensures data continuity between on-premises and cloud-based systems.
For detailed instructions and best practices on setting up SnapMirror with BlueXP, refer to the NetApp documentation: NetApp SnapMirror Documentation.
An administrator is setting up NetApp Cloud Tiering. They are creating a new S3 object storage bucket that needs to be compliant with the default IAM policy for the cloud connector.
How must the bucket be configured to meet the policy?
- A . It must have cross-region replication enabled.
- B . It must be configured to support NetApp Cloud Sync.
- C . The prefix must be set to cloud-tier.
- D . The prefix must be set to fabric-pool.
D
Explanation:
When setting up NetApp Cloud Tiering with an S3 object storage bucket, it is crucial that the bucket configuration adheres to the default IAM policy for the cloud connector.
Here’s the configuration requirement:
Bucket Configuration with Specific Prefix: The IAM policy often specifies access permissions based on resource names or prefixes. For Cloud Tiering, particularly when integrating with FabricPool technology, the bucket should have a prefix set to fabric-pool. This allows the Cloud Tiering service to correctly identify and interact with the bucket, ensuring compliance with security policies and access controls.
Verify IAM Policy Configuration: Ensure that the IAM policy for the cloud connector includes permissions for operations on the S3 bucket with the fabric-pool prefix. This typically includes permissions to put, get, list, and delete objects within the bucket.
For further information on configuring S3 buckets for NetApp Cloud Tiering and detailed IAM policy settings, please consult the NetApp Cloud Tiering documentation available on the NetApp website: NetApp Cloud Tiering Documentation.
An administrator needs to provision block storage on an AWS FSx for NetApp ONTAP instance for a Linux server.
Which protocol should be used?
- A . iSCSI
- B . FCP
- C . NVMe-oF
- D . InfiniBand
A
Explanation:
For provisioning block storage on an AWS FSx for NetApp ONTAP instance for a Linux server, the most suitable protocol is iSCSI.
Here’s why:
iSCSI Compatibility: iSCSI is widely supported across various operating systems, including Linux, and is ideal for provisioning block storage. It allows the Linux server to access storage volumes over a TCP/IP network, simulating local block storage.
Configuration Steps: To set this up, configure the FSx for NetApp ONTAP instance to provide iSCSI LUNs (Logical Unit Numbers). This involves creating an iSCSI target and associating it with the LUNs that the Linux server will access.
Connect from Linux Server: On the Linux server, set up the iSCSI initiator to connect to the iSCSI target on the FSx instance. This usually involves installing iSCSI utilities and configuring the initiator to establish and maintain the iSCSI session.
For a comprehensive guide on setting up iSCSI with FSx for NetApp ONTAP and Linux, please refer to the AWS documentation: AWS FSx for NetApp ONTAP Documentation.
An administrator notices that Cloud Data Sense is not scanning the new NFS volume that was recently provisioned.
What should the administrator enable?
- A . S3 access
- B . Read permissions
- C . CIFS access
- D . Write permissions
B
Explanation:
For Cloud Data Sense to scan an NFS volume effectively, it requires appropriate access permissions to the files and directories within the volume. Since the issue involves Cloud Data Sense not scanning a newly provisioned NFS volume, the most likely cause is insufficient read permissions. Here’s what to do:
Verify and Modify NFS Export Policies: Check the NFS export policies associated with the volume to ensure that they allow read access for the user or service account running Cloud Data Sense. This permission is critical for the service to read the content of the files and perform its data classification and management functions.
Adjust Permissions if Necessary: If the current permissions are restrictive, modify the export policy to grant at least read access to Cloud Data Sense. This might involve adjusting the export rule in the NetApp management interface.
Restart Cloud Data Sense Scan: Once the permissions are correctly configured, initiate a new scan with Cloud Data Sense to verify that it can now access and scan the volume.
For further guidance on configuring NFS permissions for Cloud Data Sense, refer to the NetApp documentation on managing NFS exports and Cloud Data Sense configuration: NetApp Cloud Data Sense Documentation.
An administrator is troubleshooting a Cloud Data Sense deep scan that failed on a Cloud Volumes ONTAP (CVO) NFS export. The scan worked a day ago with no errors. The administrator notices that the NFS export is on a volume with a recently modified export policy rule.
Which export policy rule modification will resolve this issue?
- A . superuser
- B . krb
- C . read
- D . anon
C
Explanation:
If a Cloud Data Sense deep scan of an NFS export fails after a recent modification to the export policy rule, the most critical setting to check and adjust is the read permission. Here’s how to resolve the issue:
Review the Modified Export Policy: Access the export policy settings for the NFS volume that Cloud Data Sense is attempting to scan. Check for recent changes that might have restricted read access. Modify Export Policy to Allow Read Access: Ensure that the export policy rule specifically permits read access. This permission is essential for Cloud Data Sense to read the data stored on the NFS export and perform the scan effectively.
Apply Changes and Re-test the Scan: After adjusting the export policy to ensure read access, re-run the Cloud Data Sense scan to confirm that the issue is resolved and that the scan completes successfully.
For detailed instructions on configuring NFS export policies in Cloud Volumes ONTAP, consult the NetApp documentation: NetApp NFS Export Policy Documentation.
Refer to the exhibit.
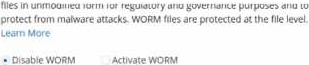

An administrator is deploying the latest version of CVO via BlueXP.
What will be the result of leaving the option disabled?
- A . After applying a license, the feature will automatically be activated.
- B . BlueXP will automatically configure new volumes with encryption.
- C . BlueXP will include this option again during new volume creation.
- D . BlueXP will automatically create future volumes as non-SnapLock.
D
Explanation:
In the context of deploying Cloud Volumes ONTAP (CVO) via BlueXP, if the administrator chooses to leave the WORM (Write Once Read Many) option disabled, the default behavior for newly created volumes will be as non-SnapLock volumes.
Here’s what this implies:
Non-SnapLock Volumes: Leaving the WORM feature disabled means that new volumes will not be created with the SnapLock compliance feature activated. SnapLock is used to ensure data immutability for compliance and regulatory purposes, protecting files from being altered or deleted before a predetermined retention period expires.
Volume Configuration Flexibility: Administrators will have the option to activate SnapLock or other data protection features on a per-volume basis in the future if needed, but this would need to be explicitly configured.
Impact on Data Management: This choice affects how data is managed in terms of compliance and security. Without SnapLock enabled by default, the volumes will operate under standard data management policies, which do not include immutability protections.
For more information on the implications of enabling or disabling SnapLock and how it affects volume creation in Cloud Volumes ONTAP, please refer to the NetApp BlueXP and SnapLock documentation: NetApp SnapLock Documentation.
An administrator is asked to set up a Cloud Volumes ONTAP (CVO) with high availability in AWS using all default configuration settings.
Where is the IAM role created?
- A . Cloud Volumes ONTAP
- B . BlueXP
- C . AWS Systems Manager
- D . AWS console
D
Explanation:
When setting up Cloud Volumes ONTAP (CVO) with high availability in AWS, the creation of an IAM role associated with CVO is performed in the AWS console. Here’s the process:
Role Creation in AWS Console: The IAM role must be created within the AWS console. This role is crucial as it grants the Cloud Volumes ONTAP instance the necessary permissions to access other AWS services as required by its configuration and operational needs.
Permissions Configuration: The IAM role should be configured with policies that provide the appropriate permissions for services that CVO needs to interact with, such as S3 for storage, EC2 for compute resources, and others depending on the specific setup.
Associate IAM Role with CVO: Once created, the IAM role is then associated with the CVO instance during its setup process in the AWS console or through BlueXP, which automates and manages NetApp configurations in cloud environments.
For detailed guidelines on creating and configuring IAM roles for Cloud Volumes ONTAP in AWS, please consult the AWS documentation and NetApp setup guides for CVO: NetApp CVO AWS Documentation.
An administrator is adding a new AFF A250 to an existing 4-node cluster that has cloud tiering enabled to AWS.
What is the minimum number of LIFs that must be added for tiering?
- A . 4
- B . 8
- C . 2
- D . 6
C
Explanation:
When adding a new AFF A250 to an existing 4-node cluster with cloud tiering enabled to AWS, a minimum of two logical interface (LIF) configurations are necessary for the tiering process.
Here’s the rationale:
LIF Configuration for Cloud Tiering: Each node in a NetApp cluster typically requires a minimum of one data LIF for client access and an additional LIF for inter-cluster communication. However, for cloud tiering purposes specifically, at least one data LIF per node is essential to manage the data movement to and from AWS.
Purpose of Additional LIFs: Since the AFF A250 is being added to an existing cluster, it will share the cluster’s existing infrastructure but will still need its data LIFs configured to participate in cloud tiering.
Best Practices: It’s advisable to configure multiple LIFs across different subnets or network paths to ensure redundancy and optimal data flow, especially in a cloud-tiered environment to maintain performance and availability.
For more specific instructions on configuring LIFs for cloud tiering in a NetApp environment, refer to NetApp’s technical documentation on cloud tiering and cluster networking: NetApp Cloud Tiering Documentation.
An administrator is using BlueXP Copy and Sync to move an NFS dataset. The Data Broker shows status "Unknown". The administrator confirms there is NFS connectivity and appropriate access to read all files.
Which network service is required?
- A . SMTP
- B . Kerberos
- C . HTTPS
- D . SMB
C
Explanation:
In the scenario where an administrator is using BlueXP Copy and Sync to move an NFS dataset and the Data Broker shows the status "Unknown" despite confirmed NFS connectivity, the required network service is HTTPS.
Here’s why:
HTTPS for Data Broker Communication: The Data Broker, which orchestrates data movement in BlueXP Copy and Sync, uses HTTPS to communicate securely with both the source and destination systems, as well as with NetApp’s cloud services. This secure communication channel is essential for managing the data transfer processes reliably and securely.
Verifying HTTPS Connectivity: Ensure that all network components, such as firewalls and routers, are configured to allow HTTPS traffic (port 443) from the Data Broker to the NFS endpoints and back. This includes checking for any blocked ports or filtered traffic that could impede the Data Broker’s operation.
Troubleshooting Network Issues: If the status remains "Unknown," further network diagnostics may be necessary to identify any disruptions or misconfigurations in HTTPS connectivity that could affect the Data Broker’s functionality.
For more detailed troubleshooting steps and configuration tips, please refer to the NetApp BlueXP documentation, focusing on the network requirements for Data Broker: NetApp Data Broker Documentation.
An administrator needs to mount an NFS export from an HA instance of Cloud Volumes ONTAP (CVO) in AWS. Data access must remain available during a failure.
Which interface must the administrator use in the mount syntax?
- A . Intercluster LIF
- B . Floating IP
- C . Load balancer
- D . Data LIF
B
Explanation:
When mounting an NFS export from a High Availability (HA) instance of Cloud Volumes ONTAP (CVO) in AWS where data access must remain available during a failure, the administrator must use a Floating IP in the mount syntax. Here’s the process:
Floating IP Configuration: A Floating IP is a virtual IP address assigned to an HA pair that can “float” between nodes. In the event of a node failure, the Floating IP can move to another node in the HA pair, ensuring continuous availability and seamless access to data.
Mount Command Syntax: The mount command should specify the Floating IP as the NFS server address, which ensures that client applications continue to have access to the NFS export, even if one of the nodes experiences a failure.
Advantages of Using Floating IP: This setup minimizes downtime and provides robust fault tolerance for applications relying on the NFS export, making it ideal for HA deployments in cloud environments like AWS.
For additional guidance on configuring and using Floating IPs with Cloud Volumes ONTAP in AWS, refer to the NetApp documentation on HA configurations: NetApp HA Configuration Guide.
Which feature of BlueXP Analysis and Control is used to uncover risk factors, and identify opportunities to improve system security?
- A . Observability
- B . Ransom ware protection
- C . Digital Advisor
- D . Classification
C
Explanation:
The feature of BlueXP Analysis and Control used to uncover risk factors and identify opportunities to improve system security is the Digital Advisor.
Here’s why:
Role of Digital Advisor: Digital Advisor provides analytics, insights, and actionable intelligence based on the data gathered from the NetApp environment. It helps administrators identify potential risks, security vulnerabilities, and operational inefficiencies.
Security and Risk Analysis: By analyzing performance metrics, configuration details, and other critical data, Digital Advisor can pinpoint areas where security improvements are needed and suggest best practices for system optimization.
Benefits of Using Digital Advisor: This tool aids in proactive management of the storage environment, ensuring that security measures are not only reactive but preventive, providing recommendations to mitigate potential threats before they impact the system.
For further details on how to utilize Digital Advisor for security improvements, visit the NetApp BlueXP documentation: NetApp Digital Advisor Documentation.
An administrator needs to set up a FlexCache volume on a Cloud Volumes ONTAP HA pair. The origin cluster is an AFF HA pair at a company data center.
How many intercluster LIFs are required at each site?
- A . 8
- B . 6
- C . 2
- D . 4
C
Explanation:
To set up a FlexCache volume on a Cloud Volumes ONTAP (CVO) HA pair where the origin cluster is an AFF HA pair at a company data center, each site typically needs at least two intercluster Logical Interface (LIFs).
Here’s why:
Purpose of Intercluster LIFs: Intercluster LIFs are used for communication between different clusters,
especially for operations involving data replication and FlexCache. Each cluster needs to have its intercluster LIFs configured to ensure proper communication across clusters.
Configuration Requirement: For a basic setup involving one origin and one destination cluster, at least one intercluster LIF per node is recommended to provide redundancy and ensure continuous availability, even if one node or one network path fails.
Best Practices: While two intercluster LIFs (one per node in an HA pair) are typically sufficient, larger deployments or environments requiring higher redundancy might opt for more intercluster LIFs. For detailed guidance on setting up intercluster LIFs and configuring FlexCache volumes, consult the NetApp documentation on FlexCache and cluster peering: NetApp FlexCache Documentation.
An administrator is deploying FlexCache volumes between a Production SVM and a Development SVM on the same 8-node cluster.
Which network is being used?
- A . NAS data LIFs
- B . Node Management
- C . IntraCluster
- D . InterCluster
C
Explanation:
When deploying FlexCache volumes between a Production SVM (Storage Virtual Machine) and a Development SVM on the same 8-node cluster, the network being used is the IntraCluster network.
Here’s why:
Role of IntraCluster Network: The IntraCluster network is specifically designed for communication within the same cluster. This network is used for operations such as data replication and data movement between different SVMs within the same physical cluster.
Purpose of FlexCache Volumes: FlexCache volumes are typically used to provide fast, localized access to data by caching it closer to where it is being accessed. In the scenario where both SVMs are within the same cluster, the IntraCluster network facilitates the necessary data transfers to establish and manage these FlexCache volumes effectively.
Optimization and Efficiency: Utilizing the IntraCluster network for this purpose ensures high-speed connectivity and reduces latency, which is crucial for maintaining performance and efficiency in operations involving multiple SVMs within the same cluster.
For additional information on FlexCache and network configurations in NetApp systems, refer to the NetApp documentation on FlexCache and cluster networking: NetApp FlexCache Documentation.