

What is a correct part of an Implicit Intent for sharing data implementation?
- A . val sendIntent = Intent(this, UploadService::class.java).apply { putExtra(Intent.EXTRA_TEXT, textMessage)
… - B . val sendIntent = Intent().apply { type = Intent.ACTION_SEND;
… - C . val sendIntent = Intent(this, UploadService::class.java).apply { data = Uri.parse(fileUrl)
… - D . val sendIntent = Intent().apply { action = Intent.ACTION_SEND
…
D
Explanation:
Create the text message with a string
val sendIntent = Intent().apply { action = Intent.ACTION_SEND putExtra(Intent.EXTRA_TEXT, textMessage) type = "text/plain" }
Reference: https://developer.android.com/guide/components/fundamentals
By default, the notification’s text content is truncated to fit one line.
If you want your notification to be longer, for example, to create a larger text area, you can do it in this way:
- A . var builder = NotificationCompat.Builder(this, CHANNEL_ID)
.setContentText("Much longer text that cannot fit one line…")
.setStyle(NotificationCompat.BigTextStyle()
.bigText("Much longer text that cannot fit one line…"))
… - B . var builder = NotificationCompat.Builder(this, CHANNEL_ID)
.setContentText("Much longer text that cannot fit one line…")
.setLongText("Much longer text that cannot fit one line…"))
… - C . var builder = NotificationCompat.Builder(this, CHANNEL_ID)
.setContentText("Much longer text that cannot fit one line…")
.setTheme(android.R.style.Theme_LongText);
…
A
Explanation:
Reference: https://developer.android.com/training/notify-user/build-notification
Select correct demonstration of WorkRequest cancellation.
- A . workManager.enqueue(OneTimeWorkRequest.Builder(FooWorker::class.java).build())
- B . val request: WorkRequest = OneTimeWorkRequest.Builder (FooWorker::class.java).build() workManager.enqueue(request)
val status = workManager.getWorkInfoByIdLiveData(request.id) status.observe(…) - C . val request: WorkRequest = OneTimeWorkRequest.Builder (FooWorker::class.java).build() workManager.enqueue(request) workManager.cancelWorkById(request.id)
- D . val request1: WorkRequest = OneTimeWorkRequest.Builder (FooWorker::class.java).build()
val request2: WorkRequest = OneTimeWorkRequest.Builder (BarWorker::class.java).build()
val request3: WorkRequest = OneTimeWorkRequest.Builder (BazWorker::class.java).build()
workManager.beginWith(request1, request2).then(request3).enqueue() - E . val request: WorkRequest = OneTimeWorkRequest.Builder (FooWorker::class.java).build()
workManager.enqueue(request) workManager.cancelWork(request)
C
Explanation:
Videos:
Working with WorkManager, from the 2018 Android Dev Summit WorkManager: Beyond the basics, from the 2019 Android Dev Summit
Reference: https://developer.android.com/reference/androidx/work/WorkManager?hl=en
In general, you should send an AccessibilityEvent whenever the content of your custom view changes. For example, if you are implementing a custom slider bar that allows a user to select a numeric value by pressing the left or right arrows, your custom view should emit an event of type TYPE_VIEW_TEXT_CHANGED whenever the slider value changes.
Which one of the following sample codes demonstrates the use of the sendAccessibilityEvent() method to report this event.
- A . override fun dispatchPopulateAccessibilityEvent(event: AccessibilityEvent): Boolean {
return super.dispatchPopulateAccessibilityEvent(event).let { completed -> if (text?.isNotEmpty() == true) {
event.text.add(text) true
} else { completed
}
}
} - B . override fun onKeyUp(keyCode: Int, event: KeyEvent): Boolean { return when(keyCode) { KeyEvent.KEYCODE_DPAD_LEFT -> {
currentValue–
sendAccessibilityEvent(AccessibilityEvent.TYPE_VIEW_TEXT_CHANGED) true
}
…
}
} - C . override fun onKeyUp(keyCode: Int, event: KeyEvent): Boolean { return when(keyCode) { KeyEvent.KEYCODE_ENTER -> {
currentValue– sendAccessibilityEvent (AccessibilityEvent.TYPE_VIEW_CONTEXT_CLICKED) true
}
…
}
}
B
Explanation:
Reference: https://developer.android.com/guide/topics/ui/accessibility/custom-views
The easiest way of adding menu items (to specify the options menu for an activity) is inflating an
XML file into the Menu via MenuInflater.
With menu_main.xml we can do it in this way:
- A . override fun onCreateOptionsMenu(menu: Menu): Boolean {
menuInflater.inflate(R.menu.menu_main, menu)
return true
} - B . override fun onOptionsItemSelected(item: MenuItem): Boolean { menuInflater.inflate(R.menu.menu_main, menu) return super.onOptionsItemSelected(item) }
- C . override fun onCreate(savedInstanceState: Bundle?) { super.onCreate(savedInstanceState)
setContentView(R.menu.menu_main)
}
A
Explanation:
Reference: https://developer.android.com/guide/topics/ui/accessibility/custom-views
Android Tests. You can use the childSelector() method to nest multiple UiSelector instances. For example, the following code example shows how your test might specify a search to find the first ListView in the currently displayed UI, then search within that ListView to find a UI element with the text property Apps.
What is the correct sample?
- A . val appItem: UiObject = device.findObject( UiSelector().className(ListView.class)
.instance(1)
.childSelector(
UiSelector().text("Apps")
)
) - B . val appItem: UiObject = device.findObject( UiSelector().className("android.widget.ListView")
.instance(0)
.childSelector(
UiSelector().text("Apps")
)
) - C . val appItem: UiObject = device.findObject( UiSelector().className("android.widget.ListView")
.instance(
UiSelector().text("Apps")
)
)
The following code snippet shows an example of an Espresso test:
- A . @Rule
fun greeterSaysHello() {
onView(withId(R.id.name_field)).do(typeText("Steve"))
onView(withId(R.id.greet_button)).do(click())
onView(withText("Hello Steve!")).check(matches(isDisplayed()))
} - B . @Test
fun greeterSaysHello() {
onView(withId(R.id.name_field)).perform(typeText("Steve"))
onView(withId(R.id.greet_button)).perform(click())
onView(withText("Hello Steve!")).check(matches(isDisplayed()))
} - C . @Test
fun greeterSaysHello() {
onView(withId(R.id.name_field)).do(typeText("Steve"))
onView(withId(R.id.greet_button)).do(click())
onView(withText("Hello Steve!")).compare(matches(isDisplayed()))
}
As an example. In an Activity we have our TimerViewModel object (extended ViewModel), named mTimerViewModel. mTimerViewModel.timer method returns a LiveData<Long> value.
What can be a correct way to set an observer to change UI in case if data was changed?
- A . mTimerViewModel!!.timer.value.toString().observe (Observer { aLong -> callAnyChangeUIMethodHere(aLong!!) })
- B . mTimerViewModel!!.timer.observe
(this, Observer { aLong -> callAnyChangeUIMethodHere(aLong!!) }) - C . mTimerViewModel.observe
(Observer { aLong -> callAnyChangeUIMethodHere(aLong!!) })
LiveData.postValue() and LiveData.setValue() methods have some differences.
So if you have a following code executed in the main thread:
liveData.postValue("a"); liveData.setValue("b");
What will be the correct statement?
- A . The value "b" would be set at first and later the main thread would override it with the value "a".
- B . The value "a" would be set at first and later the main thread would override it with the value "b".
- C . The value "b" would be set at first and would not be overridden with the value "a".
- D . The value "a" would be set at first and would not be overridden with the value "b".
In our TeaViewModel class, that extends ViewModel, we have such prorerty:
val tea: LiveData<Tea>
An observer in our Activity (type of mViewModel variable in example is TeaViewModel) is set in this way:
mViewModel!!.tea.observe(this, Observer { tea: Tea? -> displayTea(tea) })
What will be a correct displayTea method definition?
- A . private fun displayTea()
- B . private fun displayTea(tea: Tea?)
- C . private fun displayTea(tea: LiveData?<Tea>)
- D . private fun displayTea(tea: LiveData?<T>)
For example, our preferences.xml file was added by addPreferencesFromResource (R.xml.preferences). Our preferences.xml file contains such item:
<SwitchPreference android:id="@+id/notification" android:key="@string/pref_notification_key"
android:title="@string/pref_notification_title"
android:summary="@string/pref_notification_summary"
android:defaultValue="@bool/pref_notification_default_value" app:iconSpaceReserved="false"/>
In our Fragment, we can dynamically get current notification preference value in this way:
- A . val isNotificationOn = PreferenceManager.getDefaultSharedPreferences (context).getBoolean( context!!.getString(R.string.pref_notification_key), context!!.resources.getBoolean(R.bool.pref_notification_default_value)
) - B . val isNotificationOn = PreferenceManager.getSharedPreferences (context).getBoolean( context!!.getString(R.string.pref_notification_default_value), context!!.getString(R.string.pref_notification_key),
) - C . val isNotificationOn = PreferenceManager.getSharedPreferences (context).getBoolean( context!!.resources.getBoolean(R.bool.pref_notification_default_value), context!!.getString(R.string.pref_notification_key)
)
For example, our preferences.xml file was added by addPreferencesFromResource (R.xml.preferences).
Our preferences.xml file contains such item:
<ListPreference android:id="@+id/order_by" android:key="@string/pref_sort_key"
android:title="@string/pref_sort_title" android:summary="@string/pref_sort_summary"
android:dialogTitle="@string/pref_sort_dialog_title" android:entries="@array/sort_oder"
android:entryValues="@array/sort_oder_value"
android:defaultValue="@string/pref_default_sort_value" app:iconSpaceReserved="false" />
In our Fragment, we can dynamically get current notification preference value in this way:
- A . val sortBy = PreferenceManager.getDefaultSharedPreferences(context).getString( context!!.getString(R.string.pref_sort_key), context!!.resources.getBoolean(R.bool.pref_default_sort_value)
) - B . val sortBy = PreferenceManager.getSharedPreferences(context).getString( context!!.getString(R.string.pref_default_sort_value), context!!.getString(R.string.pref_sort_key),
) - C . val sortBy = PreferenceManager.getSharedPreferences(context).getBoolean( context!!.resources.getBoolean(R.bool.pref_default_sort_value), context!!.getString(R.string.pref_sort_key)
) - D . val sortBy = PreferenceManager.getDefaultSharedPreferences(context).getString( context!!.getString(R.string.pref_sort_key), context!!.getString(R.string.pref_default_sort_value)
)
For example, we have a file in our raw folder app/src/main/res/raw/sample_teas.json.
To get an InputStream for reading it, from out Context context, we can do this:
- A . val input = context!!.openRawResource(R.raw.sample_teas)
- B . val input = context!!.getRawResource(R.raw.sample_teas)
- C . val input = context!!.resources.openRawResource(R.raw.sample_teas)
For example, we have a BufferedReader reader, associated with the json file through InputStreamReader.
To get a file data we can do this:
- A . var line: String? try {
while (reader.readLine().also { line = it } != null) { builder.append(line)
}
val json = JSONObject(builder.toString())
return json
} catch (exception: IOException) { exception.printStackTrace()
} catch (exception: JSONException) { exception.printStackTrace()
} - B . var line: JSONObject ? try {
while (reader.readJSONObject ().also { line = it } != null) {
builder.append(line)
}
val json = JSONObject(builder.toString())
return json
} catch (exception: IOException) { exception.printStackTrace()
} catch (exception: JSONException) { exception.printStackTrace()
} - C . var line: String? try {
while (reader.readLine().also { line = it } != null) { builder.append(line)
}
val json = JSONObject(builder.toString()) return json
} catch (exception: RuntimeException) {
exception.printStackTrace()
} catch (exception: ArrayIndexOutOfBoundsException) { exception.printStackTrace()
}
For example, we have a file in our assets folder app/src/main/assets/sample_teas.json.
To get an InputStream for reading it, from out Context context, we can try do this:
- A . val input = context!!.resources.openRawResource(R.raw.sample_teas)
- B . val input = context!!.assets.open("sample_teas.json")
- C . val input = context!!.resources.assets.open("sample_teas.json")
An example. In our ViewModelFactory (that implements ViewModelProvider.Factory) we have an instance of our Repository, named mRepository. Our ViewModel has such constructor: class MyViewModel(private val mRepository: MyRepository) : ViewModel()…
Next, in our ViewModelFactory create ViewModel method (overriden) looks like this:
override fun <T : ViewModel?> create(modelClass: Class<T>): T {
return try {
//MISSED RETURN VALUE HERE”
} catch (e: InstantiationException) {
throw RuntimeException("Cannot create an instance of $modelClass", e)
} catch (e: IllegalAccessException) {
throw RuntimeException("Cannot create an instance of $modelClass", e)
} catch (e: NoSuchMethodException) {
throw RuntimeException("Cannot create an instance of $modelClass", e)
} catch (e: InvocationTargetException) {
throw RuntimeException("Cannot create an instance of $modelClass", e)
}
}
What should we write instead of “//MISSED RETURN VALUE HERE”?
- A . modelClass.getConstructor()
.newInstance(mRepository) - B . modelClass.getConstructor(MyRepository::class.java)
.newInstance() - C . modelClass.getConstructor(MyRepository::class.java)
.newInstance(mRepository)
What is demonstrated by the code below?
// RawDao.kt
@Dao
interface RawDao { @RawQuery
fun getUserViaQuery(query: SupportSQLiteQuery?): User?
}
// Usage of RawDao
…
val query =
SimpleSQLiteQuery("SELECT * FROM User WHERE id = ? LIMIT 1", arrayOf<Any>(sortBy))
val user = rawDao.getUserViaQuery(query)
…
- A . A method in a Dao annotated class as a raw query method where you can pass the query as a SupportSQLiteQuery.
- B . A method in a Dao annotated class as a query method.
- C . A method in a RoomDatabase class as a query method.
What happens when you create a DAO method and annotate it with @Insert?
Example:
@Dao
interface MyDao {
@Insert(onConflict = OnConflictStrategy.REPLACE)
fun insertUsers(vararg users: User)
}
- A . Room generates an implementation that inserts all parameters into the database in a single transaction.
- B . Room modifies a set of entities, given as parameters, in the database. It uses a query that matches against the primary key of each entity.
- C . Room removes a set of entities, given as parameters, from the database. It uses the primary keys to find the entities to delete.
What do you want from Room when you create a DAO method and annotate it with @Update?
Example:
@Dao
interface MyDao {
@Update
fun updateUsers(vararg users: User)
}
- A . Room generates an implementation that inserts all parameters into the database in a single transaction.
- B . Room modifies a set of entities, given as parameters, in the database. It uses a query that matches against the primary key of each entity.
- C . Room removes a set of entities, given as parameters, from the database. It uses the primary keys to find the entities to delete.
What do you want from Room when you create a DAO method and annotate it with @Delete?
Example:
@Dao
interface MyDao {
@Delete
fun deleteUsers(vararg users: User)
}
- A . Room generates an implementation that inserts all parameters into the database in a single transaction.
- B . Room modifies a set of entities, given as parameters, in the database. It uses a query that matches against the primary key of each entity.
- C . Room removes a set of entities, given as parameters, from the database. It uses the primary keys to find the entities to delete.
To automate UI tests with Android Studio, you implement your test code in a separate Android test folder.
Folder could be named:
- A . app/androidTest/java
- B . app/src/androidTest/java
- C . app/java/androidTest
Once your test has obtained a UiObject object, you can call the methods in the UiObject class to perform user interactions on the UI component represented by that object.
You can specify such actions as: (Choose four.)
- A . click() : Clicks the center of the visible bounds of the UI element.
- B . touch() : Touch the center of the visible bounds of the UI element.
- C . dragTo() : Drags this object to arbitrary coordinates.
- D . moveTo() : Move this object to arbitrary coordinates.
- E . setText() : Sets the text in an editable field, after clearing the field’s content. Conversely, the clearTextField() method clears the existing text in an editable field.
- F . swipeUp() : Performs the swipe up action on the UiObject. Similarly, the swipeDown(), swipeLeft(), and swipeRight() methods perform corresponding actions.
If you want to access a specific UI component in an app, use the UiSelector class. This class represents a query for specific elements in the currently displayed UI.
What is correct about it? (Choose two.)
- A . If more than one matching element is found, the first matching element in the layout hierarchy is returned as the target UiObject.
- B . If no matching UI element is found, an IOException is thrown.
- C . If more than one matching element is found, the last matching element in the layout hierarchy is returned as the target UiObject.
- D . If no matching UI element is found, a UiAutomatorObjectNotFoundException is thrown.
Each time your test invokes onView(), Espresso waits to perform the corresponding UI action or assertion until the following synchronization conditions are met: (Choose three.)
- A . The message queue is empty.
- B . The message queue is not empty.
- C . There are some instances of AsyncTask currently executing a task.
- D . There are no instances of AsyncTask currently executing a task.
- E . Some developer-defined idling resources are not idle.
- F . All developer-defined idling res
Run your test in one of the following ways (select possible): (Choose three.)
- A . To run a single test, open the Project window, and then right-click a test and click Run.
- B . To test all methods in a class, right-click a class or method in the test file and click Run.
- C . To run all tests in a directory, right-click on the directory and select Run tests.
- D . To run all tests in Project, open the Project window, and then right-click a test and click Run.
To create a basic JUnit 4 test class, create a class that contains one or more test methods. A test method begins with the specific annotation and contains the code to exercise and verify a single functionality in the component that you want to test.
What is the annotation?
- A . @RunWith
- B . @LargeTest
- C . @Rule
- D . @Test
The Testing Pyramid, shown in the Figure, illustrates how your app should include the three categories of tests: small, medium, and large. Medium tests are integration tests that:
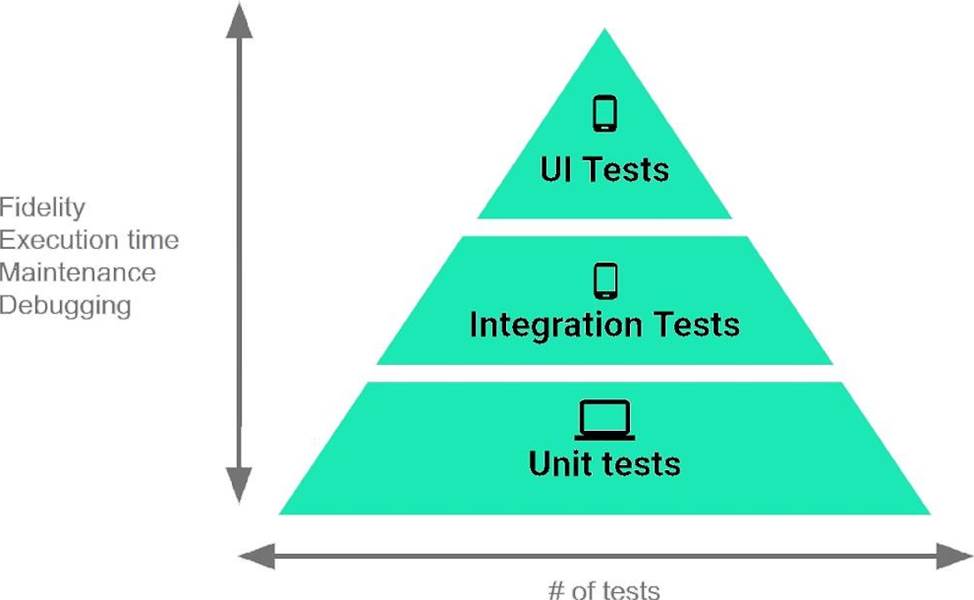

- A . validate your app’s behavior one class at a time.
- B . validate either interactions between levels of the stack within a module, or interactions between related modules.
- C . validate user journeys spanning multiple modules of your app.
The Testing Pyramid, shown in the Figure, illustrates how your app should include the three categories of tests: small, medium, and large. Small tests are unit tests that:
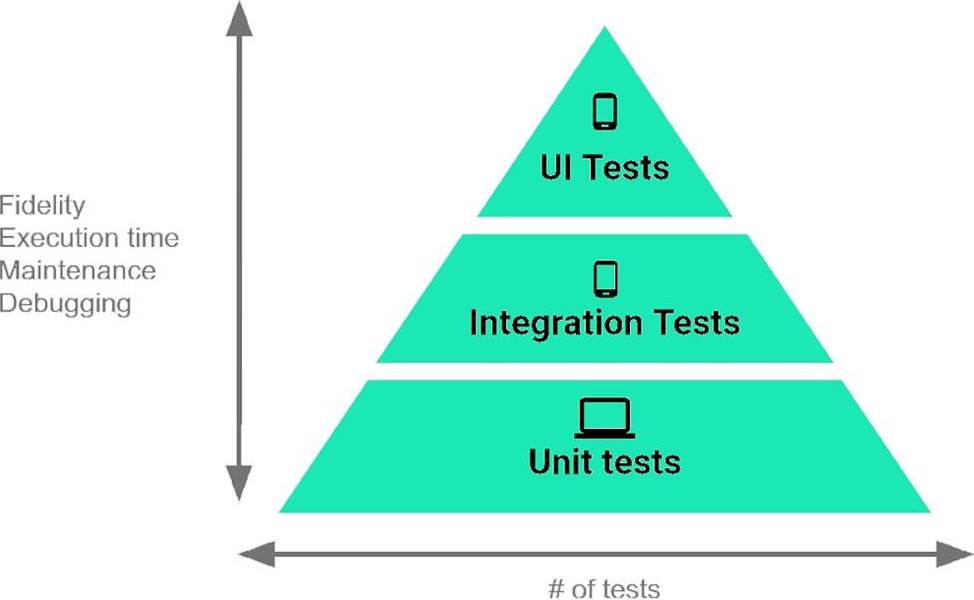
- A . validate your app’s behavior one class at a time.
- B . validate either interactions between levels of the stack within a module, or interactions between related modules.
- C . validate user journeys spanning multiple modules of your app.
What is illustrated in the picture?
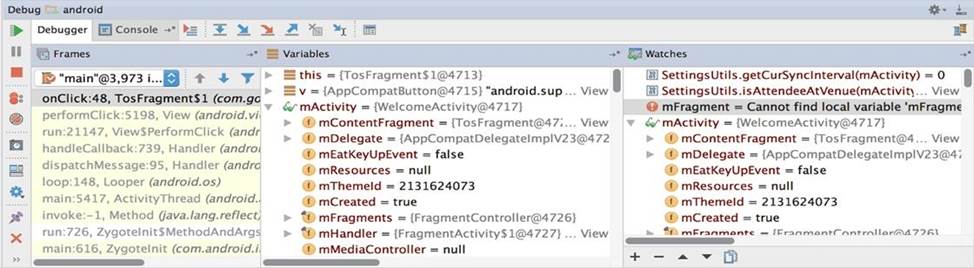

- A . Logcat window with filter settings
- B . Debugging native code using LLDB
- C . The Variables and Watches panes in the Debugger window
- D . The Breakpoints window lists all the current breakpoints and includes behavior settings for each
- E . Adding a watchpoint to a variable in memory
What is illustrated in the picture?
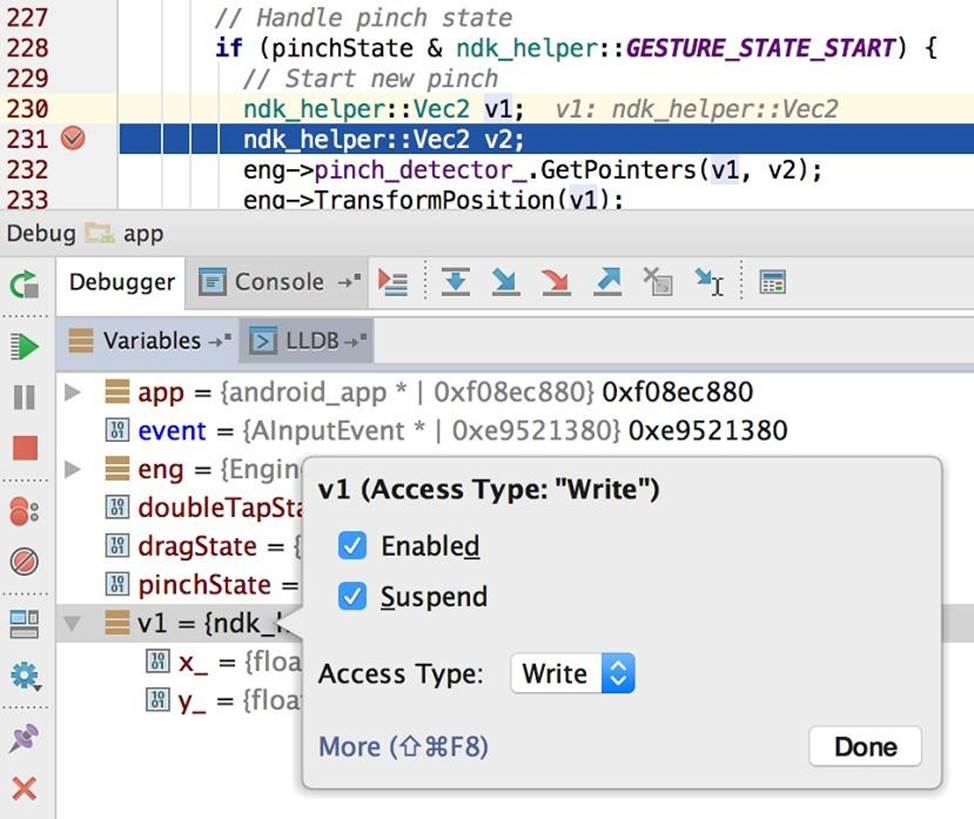

- A . Logcat window with filter settings
- B . Debugging native code using LLDB
- C . The Variables and Watches panes in the Debugger window
- D . The Breakpoints window lists all the current breakpoints and includes behavior settings for each
- E . Adding a watchpoint to a variable in memory
When your code execution reaches the breakpoint, Android Studio pauses execution of your app. You can then use the tools in the Debugger tab to identify the state of the app.
![]()

With Step Into you can
- A . examine the object tree for a variable, expand it in the Variables view. If the Variables view is not visible
- B . evaluate an expression at the current execution point
- C . advance to the next line in the code (without entering a method)
- D . advance to the first line inside a method call
- E . advance to the next line outside the current method
- F . continue running the app normally
When your code execution reaches the breakpoint, Android Studio pauses execution of your app. You can then use the tools in the Debugger tab to identify the state of the app.
![]()

With Evaluate Expression you can
- A . examine the object tree for a variable; expand it in the Variables view
- B . evaluate an expression at the current execution point
- C . advance to the next line in the code (without entering a method)
- D . advance to the first line inside a method call
- E . advance to the next line outside the current method
- F . continue running the app normally
When your code execution reaches the breakpoint, Android Studio pauses execution of your app. You can then use the tools in the Debugger tab to identify the state of the app.
![]()

With Step Over you can
- A . examine the object tree for a variable; expand it in the Variables view.
- B . evaluate an expression at the current execution point
- C . advance to the next line in the code (without entering a method)
- D . advance to the first line inside a method call
- E . advance to the next line outside the current method
- F . continue running the app normally
When your code execution reaches the breakpoint, Android Studio pauses execution of your app. You can then use the tools in the Debugger tab to identify the state of the app.
![]()

With Step Out you can
- A . examine the object tree for a variable; expand it in the Variables view. If the Variables view is not visible
- B . evaluate an expression at the current execution point
- C . advance to the next line in the code (without entering a method)
- D . advance to the first line inside a method call
- E . advance to the next line outside the current method
- F . continue running the app normally
The Log class allows you to create log messages that appear in logcat. Generally, you could use the following log methods: (Choose five.)
- A . Log.e(String, String) (error)
- B . Log.a(String, String) (all outputs)
- C . Log.w(String, String) (warning)
- D . Log.i(String, String) (information)
- E . Log.q(String, String) (Question:s)
- F . Log.d(String, String) (debug)
- G . Log.v(String, String) (verbose)
Filter logcat messages. If in the filter menu, a filter option “Show only selected application”? means:
- A . Display the messages produced by the app code only (the default). Logcat filters the log messages using the PID of the active app.
- B . Apply no filters. Logcat displays all log messages from the device, regardless of which process you selected.
- C . Create or modify a custom filter. For example, you could create a filter to view log messages from two apps at the same time.
Filter logcat messages. If in the filter menu, a filter option “Edit Filter Configuration”? means:
- A . Display the messages produced by the app code only (the default). Logcat filters the log messages
using the PID of the active app. - B . Apply no filters. Logcat displays all log messages from the device, regardless of which process you selected.
- C . Create or modify a custom filter. For example, you could create a filter to view log messages from two apps at the same time.
The Layout Inspector in Android Studio allows you to compare your app layout with design mockups, display a magnified or 3D view of your app, and examine details of its layout at runtime.
When this is especially useful?
- A . when your layout is built entirely in XML rather than runtime and the layout is behaving expectedly.
- B . when your layout is built at runtime rather than entirely in XML and the layout is behaving unexpectedly.
If you want the Database Inspector to automatically update the data it presents as you interact with your running app, check the Live updates checkbox at the top of the inspector window.
While live updates are enabled, what happens with the table in the inspector window?
- A . It is still editable. You can modify data in a table by double-clicking a cell, typing a new value, and pressing Enter.
- B . It becomes read-only and you cannot modify its values.
- C . It becomes read-only, but you cannot see its updated values before updating the data by clicking the Refresh table button at the top of the inspector window.
Enable debugging on your device: If you are using the emulator, this is enabled by default. But for a connected device, you need to
- A . enable transfer data from the device in usb connection options.
- B . enable debugging in the device developer options.
- C . enable connection in bluetooth options.
To run a debuggable build variant you must use a build variant that includes
- A . minifyEnabled false in the build configuration
- B . debuggable true or debuggable false in the build configuration
- C . debuggable true in the build configuration
About running a debuggable build variant. Usually, you can just select the default "debug" variant that’s included in every Android Studio project (even though it’s not visible in the build.gradle file). But if you define new build types that should be debuggable, you must add ‘debuggable true’ to the build type.
Is that mostly true?
- A . Yes.
- B . No, if you define new build types that should be debuggable, you must add ‘debuggable false’
- C . No, the debug variant should be visible in the build.gradle file anyway.
With a room database. When performing queries, you’ll often want your app’s UI to update automatically when the data changes.
Can you use a return value of type LiveData in your query method description to achieve this?
- A . Yes
- B . No
A
Explanation:
Room generates all necessary code to update the LiveData when the database is updated.
As an example. Our MutableLiveData<Long> object, named mLapseTime, is not connected to a Room database, etc.
How can we change the value in mLapseTime?
- A . mLapseTime.postValue(“new String”)
- B . mLapseTime.setValue(1000l)
- C . mLapseTime.changeValue(1000l)
Interface for a callback to be invoked when a shared preference is changed.
Interface is named:
- A . android.content.SyncStatusObserver
- B . android.content.SharedPreferences.Editor
- C . android.content.SharedPreferences.OnSharedPreferenceChangeListener
- D . android.content.SharedPreferences